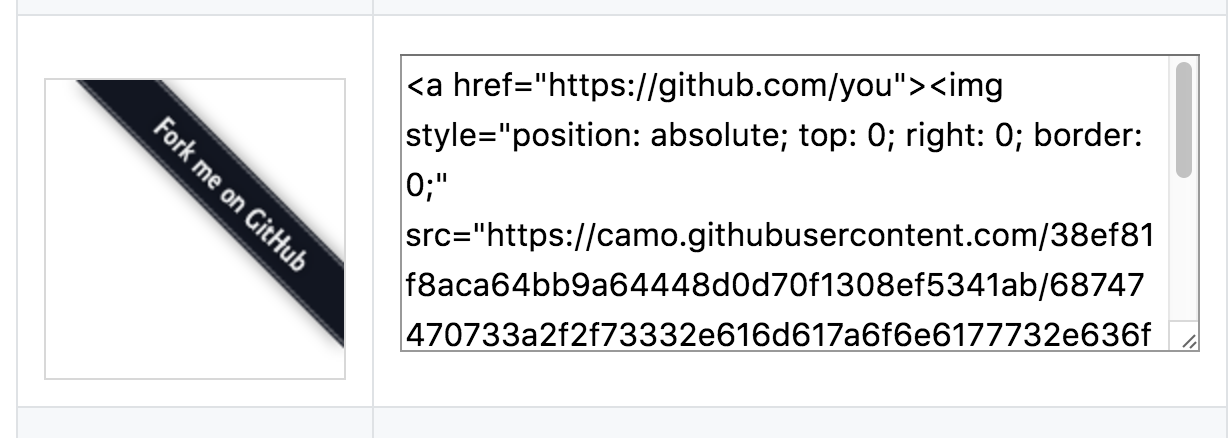
1. 在右上角或者左上角实现fork me on github
实现效果图


具体实现方法
点击这里或者这里挑选自己喜欢的样式,并复制代码。 例如,我是复制如下代码:
然后粘贴刚才复制的代码到 1
2
3
4
5
6
7
8{% asset_img 4.png %}
### 2. 添加RSS ###
实现效果图
{% asset_img 5.png %}
具体实现方法
切换到你的blog(我是取名blog,具体的看你们的取名是什么)的路径,例如我是在`/Users/chenzekun/Code/Hexo/blog`这个路径上,也就是在你的根目录下,然后安装 Hexo 插件:(这个插件会放在node_modules这个文件夹里)
```html
npm install --save hexo-generator-feed
然后打开跟目录下的_config.yml配置文件。在里面的末尾添加:(请注意在冒号后面要加一个空格,不然会发生错误!)
1 | # Extensions |
然后打开next主题文件夹里面的_config.yml,在里面配置为如下样子:(就是在rss:的后面加上/atom.xml,注意在冒号后面要加一个空格)
1 | # Set rss to false to disable feed link. |
配置完之后运行:
1 | hexo g |
重新生成一次,你会在./public 文件夹中看到atom.xml文件。然后启动服务器查看是否有效,之后再部署到Github中。
3. 实现点击出现桃心效果
具体实现方法
在网址输入如下
1 | http://7u2ss1.com1.z0.glb.clouddn.com/love.js |
然后将里面的代码copy一下,新建love.js文件并且将代码复制进去,然后保存。将love.js文件放到路径/themes/next/source/js/src里面,然后打开\themes\next\layout\_layout.swig文件,在末尾(在前面引用会出现找不到的bug)添加以下代码:
1 | <!-- 页面点击小红心 --> |
4. 修改文章内链接文本样式
实现效果图

具体实现方法
修改文件themes\next\source\css\_common\components\post\post.styl,在末尾添加如下css样式,:
1 | // 文章内链接文本样式 |
其中选择.post-body是为了不影响标题,选择 p 是为了不影响首页“阅读全文”的显示样式,颜色可以自己定义。
5. 修改文章底部的那个带#号的标签
实现效果图

具体实现方法
修改模板/themes/next/layout/_macro/post.swig,搜索 rel="tag">#,将 # 换成<i class="fa fa-tag"></i>
6. 在每篇文章末尾统一添加“本文结束”标记
具体实现方法
在路径\themes\next\layout\_macro中新建 passage-end-tag.swig文件,并添加以下内容:
1 | <div> |
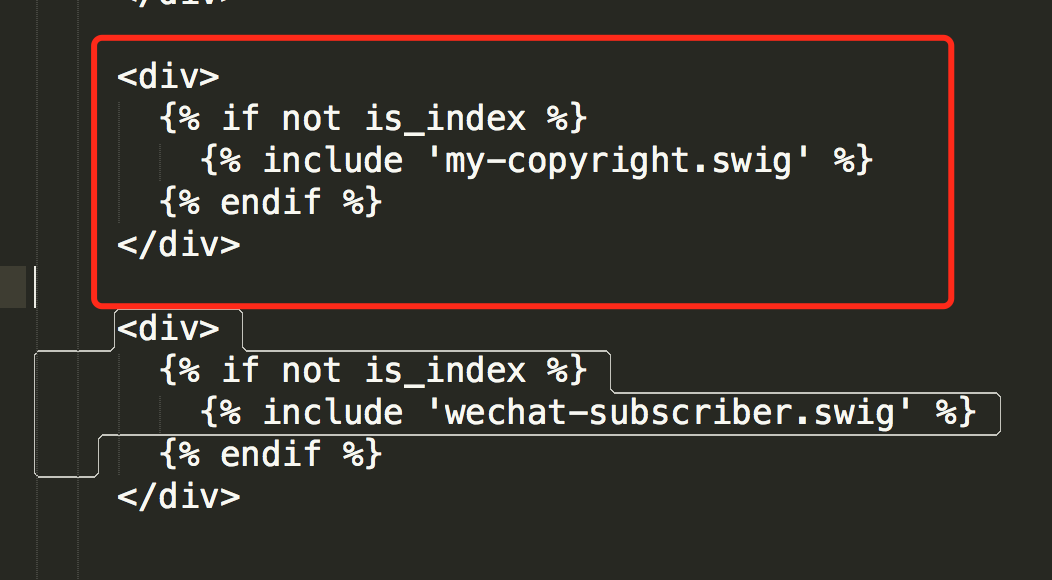
接着打开\themes\next\layout\_macro\post.swig文件,在post-body 之后, post-footer 之前添加如下画红色部分代码(post-footer之前两个DIV):
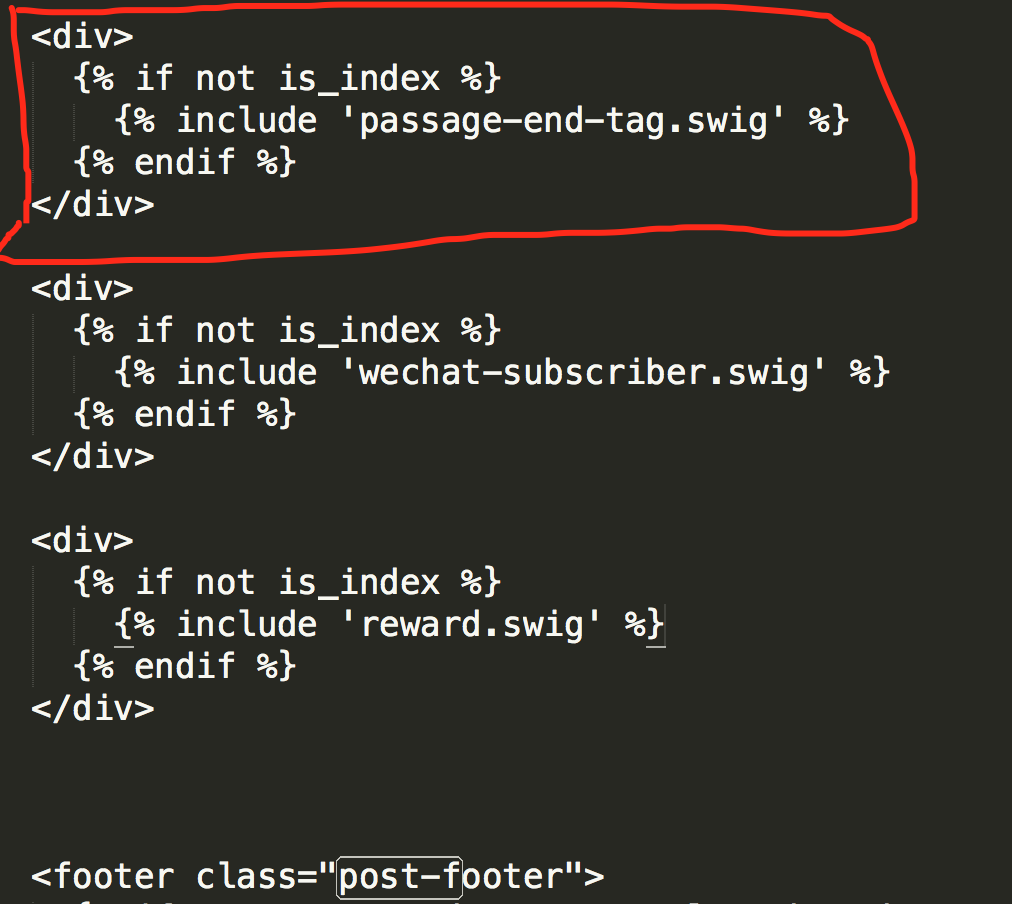
代码如下:
1 | <div> |
然后打开主题配置文件(_config.yml),在末尾添加:
1 | # 文章末尾添加“本文结束”标记 |
完成以上设置之后,在每篇文章之后都会添加如上效果图的样子。
7. 修改作者头像并旋转
打开\themes\next\source\css\_common\components\sidebar\sidebar-author.styl,在里面添加如下代码:
1 | .site-author-image { |
8. 博文压缩
在站点的根目录下执行以下命令:
1 | npm install gulp -g |
新建gulpfile.js,并填入以下内容:
1 | var gulp = require('gulp'); |
生成博文是执行 hexo g && gulp就会根据 gulpfile.js中的配置,对public目录中的静态资源文件进行压缩。
9. 修改``代码块自定义样式
打开\themes\next\source\css\_custom\custom.styl,向里面加入:(颜色可以自己定义)
1 | // Custom styles. |
10. 侧边栏社交小图标设置

打开主题配置文件(_config.yml),搜索social_icons:,在图标库找自己喜欢的小图标,并将名字复制在如下位置,保存即可

11. 主页文章添加阴影效果
打开\themes\next\source\css\_custom\custom.styl,向里面加入:
1 | // 主页文章添加阴影效果 |
12. 在网站底部加上访问量
打开\themes\next\layout\_partials\footer.swig文件,在copyright前加上画红线这句话:

代码如下:
1 | <script async src="https://busuanzi.ibruce.info/busuanzi/2.3/busuanzi.pure.mini.js"></script> |
然后再合适的位置添加显示统计的代码,如图:

代码如下:
1 | <div class="powered-by"> |
在这里有两中不同计算方式的统计代码:
pv的方式,单个用户连续点击n篇文章,记录n次访问量
1
2
3<span id="busuanzi_container_site_pv">
本站总访问量<span id="busuanzi_value_site_pv"></span>次
</span>uv的方式,单个用户连续点击n篇文章,只记录1次访客数
1
2
3<span id="busuanzi_container_site_uv">
本站总访问量<span id="busuanzi_value_site_uv"></span>次
</span>
添加之后再执行hexo -g,hexo s然后再刷新页面就能看到效果
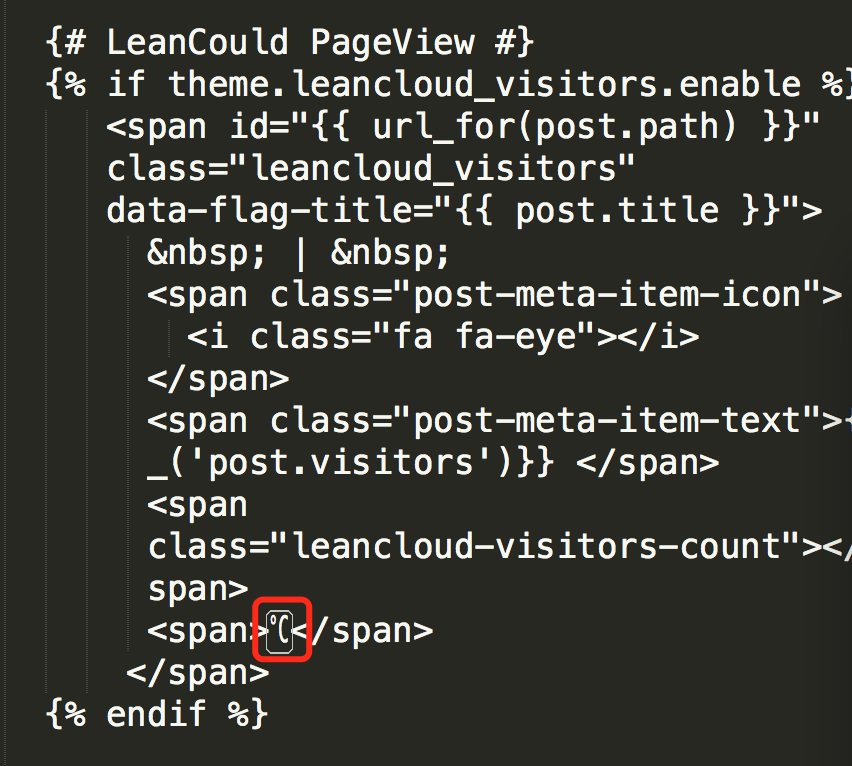
13. 添加热度
实现效果图

实现方法
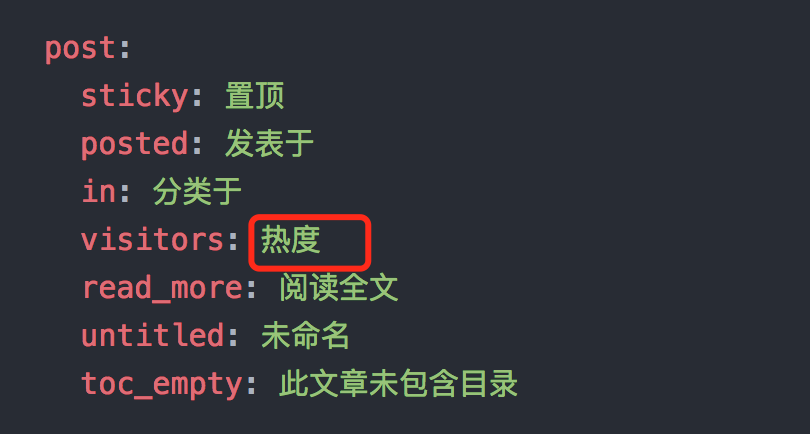
next主题集成leanCloud,打开/themes/next/layout/_macro/post.swig,在画红线的区域添加℃:
然后打开,/themes/next/languages/zh-Hans.yml,将画红框的改为热度就可以了
14. 网站底部字数统计
切换到根目录下,然后运行如下代码
1 | npm install hexo-wordcount --save |
然后在/themes/next/layout/_partials/footer.swig文件尾部加上:
1 | <div class="theme-info"> |
15. 添加 README.md 文件
每个项目下一般都有一个 README.md 文件,但是使用 hexo 部署到仓库后,项目下是没有 README.md 文件的。
在 Hexo 目录下的 source根目录下添加一个README.md文件,修改站点配置文件_config.yml,将 skip_render 参数的值设置为
1 | skip_render: README.md |
保存退出即可。再次使用hexo d 命令部署博客的时候就不会在渲染 README.md 这个文件了。
16. 设置网站的图标Favicon
在EasyIcon中找一张(32*32)的ico图标,或者去别的网站下载或者制作,并将图标名称改为favicon.ico,然后把图标放在/themes/next/source/images里,并且修改主题配置文件:
1 | # Put your favicon.ico into `hexo-site/source/` directory. |
17. 实现统计功能
阅读时长,字数统计
在根目录下安装 hexo-wordcount,运行:
1 | npm install hexo-wordcount --save |
然后在主题的配置文件中,配置如下:
1 | # Post wordcount display settings |
18. 在文章底部增加版权信息
在目录next/layout/_macro/下添加 my-copyright.swig:
1 | {% if page.copyright %} |
在目录next/source/css/_common/components/post/下添加my-post-copyright.styl:
1 | .my_post_copyright { |
修改next/layout/_macro/post.swig,在代码
1 | <div> |
之前添加增加如下代码:
1 | <div> |
修改next/source/css/_common/components/post/post.styl文件,在最后一行增加代码:
1 | @import "my-post-copyright" |
保存重新生成即可。
如果要在该博文下面增加版权信息的显示,需要在 Markdown 中增加copyright: true的设置,类似:
如果你觉得每次都要输入copyright: true很麻烦的话,那么在/scaffolds/post.md文件中添加:
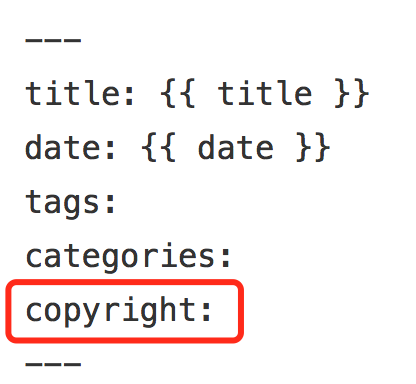
这样每次hexo new "你的内容"之后,生成的md文件会自动把copyright:加到里面去
(注意:如果解析出来之后,你的原始链接有问题:如:http://yoursite.com/前端小项目:使用canvas绘画哆啦A梦.html,那么在根目录下`_config.yml`中写成类似这样:)

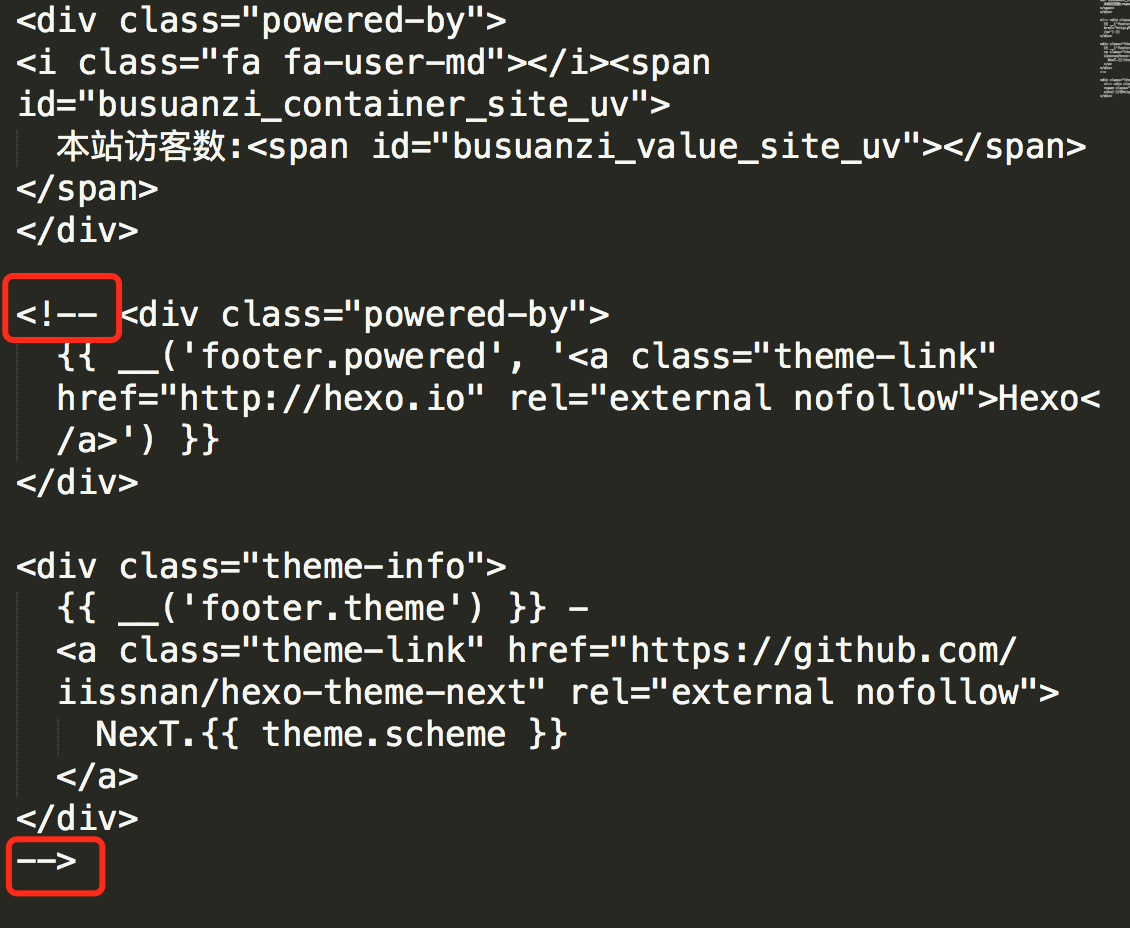
19. 隐藏网页底部powered By Hexo / 强力驱动
打开themes/next/layout/_partials/footer.swig,使用””隐藏之间的代码即可,或者直接删除。位置如图:
20. 修改网页底部的桃心
还是打开themes/next/layout/_partials/footer.swig,找到:
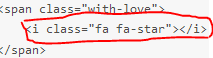
然后还是在图标库中找到你自己喜欢的图标,然后修改画红线的部分就可以了。
21. 文章加密访问
打开themes->next->layout->_partials->head.swig文件,在以下位置插入这样一段代码:
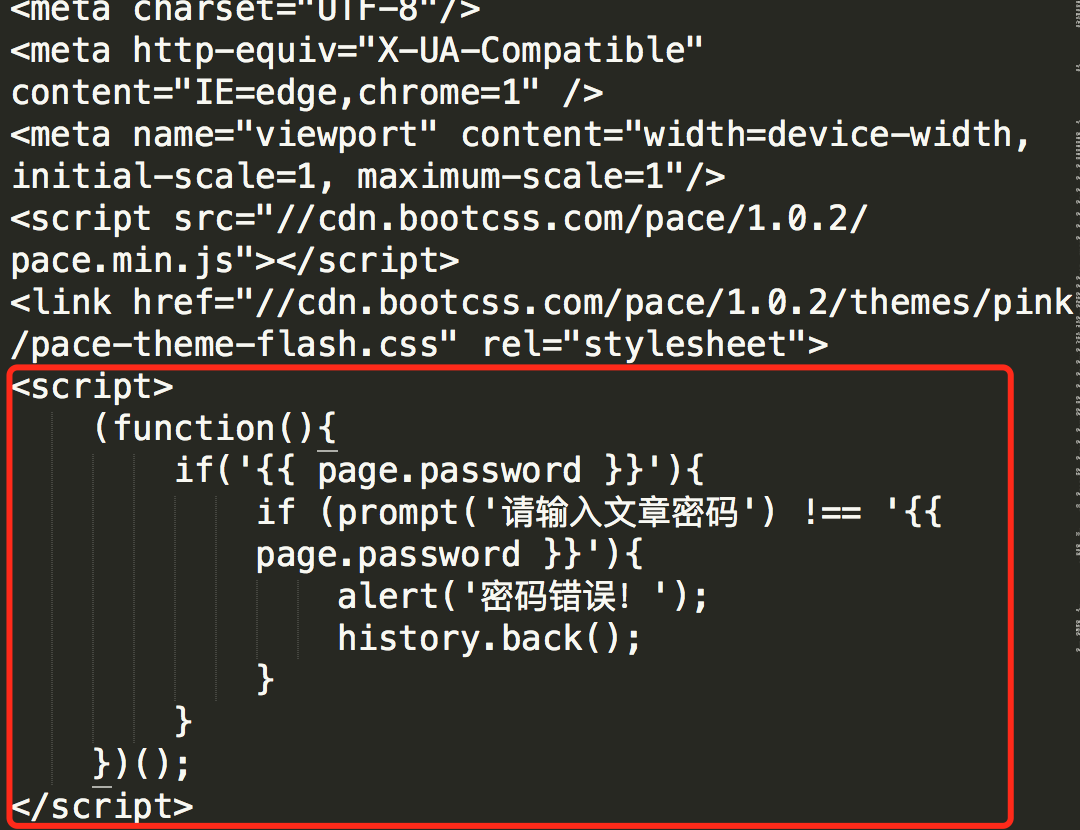
1 | <script> |
后在文章上写成类似这样:
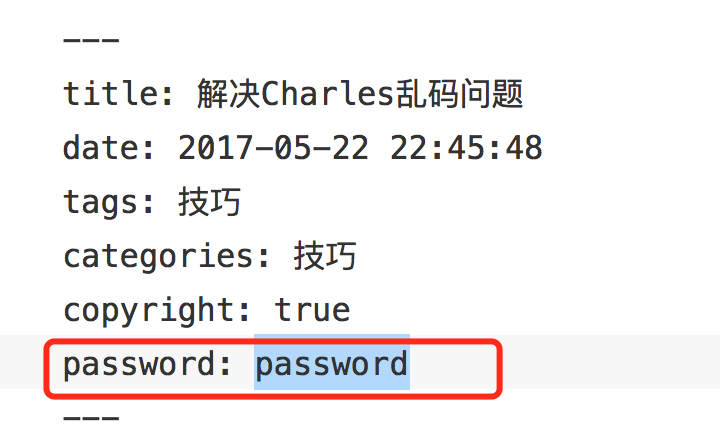
22. 博文置顶
修改hero-generator-index插件,把文件:node_modules/hexo-generator-index/lib/generator.js 内的代码替换为:
1 | 'use strict'; |
在文章中添加 top 值,数值越大文章越靠前,如
1 | --- |
23. 修改字体大小
打开\themes\next\source\css\ _variables\base.styl文件,将$font-size-base改成16px,如下所示:
1 | $font-size-base =16px |
24. 侧边栏推荐阅读
打开主题配置文件修改成这样就行了(links里面写你想要的链接):
1 | # Blogrolls |
25. 自定义鼠标样式
打开themes/next/source/css/_custom/custom.styl,在里面写下如下代码
1 | // 鼠标样式 |
其中 url 里面必须是 ico 图片,ico 图片可以上传到网上(我是使用七牛云图床),然后获取外链,复制到 url 里就行了
26. 为博客加上萌萌的宠物
在终端切换到你的博客的路径里,然后输入如下代码:
1 | npm install -save hexo-helper-live2d |
然后在在 hexo 的 _config.yml中添加参数:(具体配置可以看官方文档)
1 | live2d: |
然后hexo clean ,hexo g ,hexo d就可以看到了。
注意!如果你在 hexo d 的时候出现我下面这个问题

你可以这样,首先删除hexo 下面的.deploy_git文件夹,然后运行
1 | git config --global core.autocrlf false |
重新hexo clean,hexo g,hexo d就行了